TOKYO, JAPAN - Day 3 - GotoKuji Temple, Meiji Jingu Shrine, Shinjuku at night

GOTOKUJI TEMPLE - ’BECKONING CAT TEMPLE’

We set off quite early in the morning to GotoKuji Temple, where we hoped to find the temple dedicated to Manekineko, the beckoning cat. Based on all the photos I had seen of the cute little cat statues, I thought this would be the perfect temple to keep the girls interested. We caught the train out past Shibuyu to Shimo-Kitazawa Station, where we changed to a local train and headed to Gotokuji Station. We had to stroll through some suburban streets to find the temple, which is actually one of myself and Braino’s favourite thing to do when traveling - see what everyday houses look like, it’s such a fascinating way to catch a glimpse of local life.

GotoKuji is a beautifully serene temple and the little statues of Manekineko did not disappoint. Legend has it that ‘one day, a lord on his way back from falconry was beckoned by a cat at the temple gate and decided to stop by. While spending time at the temple, thunder suddenly rang out and rain began to fall. Having gotten well out of a thundershower with an enjoyable conversation with the temple master, the lord was impressed by this luck that the cat brought. The lord was Naotaka Ii, the lord of Hikone domain. Financially backed up by Naotaka, Gotokuji temple was rebuilt in 1633. Later, Gotokuji temple built the Shofuku-den to enshrine the cat that brought good fortune, naming it as "Manekineko". Ever since, many people visit Shofuku-den continuously to pray for well-being for the family, prosperous business, luck and happiness.’ (This comes directly from the website. https://gotokuji.jp/en/manekineko/ )

We realised that we could purchase a cat statue from the administration office and leave it there with the rest of the collection as an offering, to bring us good fortune . The girls loved this idea and were thrilled to leave one of our own. As I write this blogpost almost a week later, everything we’ve done in Japan so far has been amazing but I think this is one of my highlights.

Afterwards we headed back via Shibuya, the second busiest train station in the world, whihc is also home to the iconic scramble crossing. We decided to check it out for ourselves, but this stage it was very hot and extremely crowded. We were all a bit frazzled, and the amazement of the scramble crossing was a bit lost on us to be honest. We ducked into Uniqlo to buy some socks and then headed back to the apartment were we rested and watched a movie on the laptop until around 4pm. (Braino and Rooney has a little nap).

MEIJI JINGU SHRINE

The rest period was quite strategic as we had plans to head out again in the later afternoon to experience Shinkuju at night. First we headed to Meiji Jingu Shrine, and I’m so glad we did, it was truly breath-taking. Meiji Jingu is a stunning Shinto Shrine that is set amoungst 70 hectares of dense forest. It was so peaceful and enchanting to walk through the winding paths that lead through the forests to the main part of the shrine, it was easy to forget we were right in the middle of Tokyo. While Senso-Ji is a buddhist temple, Meiji Jingu is a Shinto Shrine. Shinto is Japan’s ancient original religion or belief system as there isn’t a founder or religious book.

We walked from the southern entrance at Harajuku, all the way to the northern entrance in Yoyogi. It was a decent distance but the girls enjoyed it. It was late in the afternoon, the temperature was perfect and the low afternoon sun light was glimmering through the trees.

SHINJUKU AT NIGHT

We were planning to go to the Toyko Metropolitan Government Building again as there is a free nightly light projection show that started at 7:30pm and because we had the time, we decided to walk all the way up through Shinjuku. Shinjuku and Shibuya are two destinations where you can see all the iconic neon lights that are synonymous with Toyko and I was keen to see (and photography) it for myself. The streets between Shinjuku Station and the Toyko Metropolitan Government Building felt like a great kid friendly option. We found an acrade full of claw machine that the girls loved have a turn of (although we didn’t win anything) There were lots of restaurants and crowds are still very intense but it didn’t seem too overwhelming for the girls.

The light projection show at the government building was fantastic, it was sort of similar to TeamLabs in a way but the best bit was Godzilla! It went for 15 minutes in total and it started with a short section of Godzilla ‘smashing’ the TMGB. The girls have come mildly obsessed with Godzilla after we watched some videos on youtube of the older Japanese Godzilla movies, the really funny retro Godzilla. While the projection show runs for 15mins, it’s play on a loop until 9:30pm and it’s totally free!

Afterwards, Braino took the girls back to the accommodation via the trains while I headed into a seperate section of Shinjuku, to take more photos. It was Saturday night so it was extremely busy, but I felt quite safe on my own. It’s so mind blowing to see so many people, all on their way somewhere. It’s a very surreal feeling to just be apart of it.

TOKYO, JAPAN - Day 2 - Tokyo Toy Museum, Tokyo Metropolitan Government Building

SENSOI-JI TEMPLE  (Again)

I set an alarm for 4:30am so I could head out on a solo photography mission to Senso-Ji again, as I wanted to take some time to photograph the beautiful temple complex without the crowds.

I was surprised to discover that the trains in Tokyo don’t run between the hours of 1am and 5am so the earliest I could get out there was 5:35am. It was well worth the early start as the crowds had totally disappeared compared to the day before. There was a few other photographers and plenty of people out for a morning stroll with dogs. The sound of monks chanting and smell of incense filled the air. It was an incredibly peaceful way to experience this scared site.

If I were to come again with the rest of the family, I’d aim for 8am - 9am. The stalls along Nakamise-Dori open at 9:00am so if you arrived a little before 9am, you could beat the crowded but still browse all the interesting stalls and shops.

TOKYO TOY MUSEUM

Thanks to all the YouTube videos we watched in the lead up to the trip, I knew about the Tokyo Toy Museum, which looked like just the thing our girls would enjoy.


The Tokyo Toy Museum is set in an old elementary school and features many rooms that display toys from Japan and around the world. The majority are beautifully made wooden toys and the best part is that it is incredibly interactive. Children can play with a huge assortment of toys, puzzles and games.

The Wooden Forest room had a unique ball pit full of wooden balls and the girls especially loved the yellow room which had such a wide variety of wooden fruits and vegetables that the they could pick off the wooden trees and pretend to wash and sort.

The staff were incredible friendly and encouraged the girls to sit and play games with them, which was such a lovely experience. There was even a little craft class set up in what looked like an old art classroom.

We stayed for over two hours and found the whole space so engaging and interactive for the girls. Even Braino and I got carried away trying to out do each other on a particularly fun skill tester type puzzle.

I booked tickets online via the Toy Museums website the night before. It was 800 yen for the girls and 1,100 yen for adults (roughly $8AUD for children and $11AUD for adults)

The Toy Museum is located in Yotsuya, Shinjuku City and we were able to reach it by catching the Marunouchi Line to Yotsuya-Sanchome Station from Akasaka-Mitsuke Station.

TOKYO METROPOLITAN GOVERNMENT BUILDING, SHINJUKU

From the Tokyo Toy Museum we jumped on the train again and headed into Shinjuku, which is the world’s busiest train station! We were headed to the Tokyo Metropolitan Government Building and were surprised to find that there was a whole underground network of tunnels that lead from Shinjuku Station all the way to the Government Building. The Tokyo metro system is phenomenal.

The Metropolitan Government Building has a free observation deck in Building 1. It was very easy to find the correct elevator and we didn’t have to wait too long. It was amazing to see Tokyo sprawled out beneath us from 200m high. There are apparently many other vantage points where you can see Tokyo from above, but the TMGB is a fantastic free option. The whole level was quite spacious and there was a cafe, gift shop and even someone playing a grand piano.

SHINJUKU CHUO PARK PLAYGROUND

We discovered a fun playground in the beautifully landscaped Shinjuku Chuo Park behind the Tokyo Metropolitan Government Building. It had a great obstacle course style playground for older kids and a section dedicated to toddlers as well. The girls had a wonderful time playing for an hour or so. And best of all, it’s a totally free public playground. A great way to finish up the beautiful afternoon.

TOKYO, JAPAN - Day 1 - Senso-Ji Temple, Origami Class & TeamLab Planets

After such a huge travel day we had a slower start to the morning. Braino went out to purchase local SIM cards and food for breakfast. Yoghurt, fruit and croissants were an easy solution from the local Family Mart.

We first travelled from where we were staying in Akasaka-Mitsuke to Asakusa via the metro system. Navigating the underground rail system of Tokyo was surprisingly easy with the help of google maps, there are also english translation on all the signage which was extremely helpful.

Senso-Ji Temple, Asakusa

Senso-Ji Temple was only a short walk from Asakusa Station. This huge Buddhist temple complex is devoted to the deity Kannon and is one of the most significant religious sites in Tokyo. At 11am it was extremely crowded, so we only did a quick walk through.  Nakamise-Dori, the long shopping promenade, was full with interesting stalls, filled with souveniers, crafts and an assortment of different foods. It would have been interesting to linger long at some of the stalls but the crowds were intense. It’s free to enter the grounds of the temple and the stunning architecture was an excellent introduction to Japanese culture.

We found a beautiful little playground a few blocks over from Senso-Ji Temple in Hanakawando Park. The girls had a great time climbing on the fort like structure under a beautiful big tree.

Workshop at Taro’s Origami Studio, Asakusa

We had pre-booked an origami workshop in Asakusa at Taro’s Origami Studio so we continued on to find the quaint little studio gallery. I have fond memories of learning origami when I was around the age of 9, so it was really quite special to introduce the girls to origami, the art of paper folding, whilst in Japan. The little gallery is the home to stunning origami creations by the artist Taro and a workshop table for up to six people. The table had six different small iPads with a variety of different instructional videos. Braino helped Rooney while I helped Hallie and we managed to get through five different beginner origami patterns. Our host was fantastic, he spoke english with a North American accent and he often helped Farley, although she was fairly confident on her own.

TeamLabs Planets

Next we headed towards Toyosu, with a quick stop off in Ginza to change trains, as we had pre-booked tickets for TeamLabs Planets. TeamLab Planets is best described as a huge interactive digital art gallery. It has a number of different galleries that use water, lights, mirrors and colours to create a fully immersive sensory experiences.

I had actually experienced a taste of TeamLabs Borderless when it was at the Sydney Powerhouse museum in 2018, but the girls were just babies and toddlers at that point. It’s certainly one of the most talked about things to do in Tokyo and I’m pleased to say that the girls loved it! Our favourite was the dark room with knee deep water that has digitally projected fish swimming around that actually react to the movement of the people walking through. I also loved the colourful room filled with huge spheres. It was pretty busy but I have a feeling that it’s wasn’t as busy as it could be, judging by how long the line barriers were outside. We only had to wait 10 or so minutes to get in but it looked like lines could get much longer.

Despite the crowds it was still an experience that the whole family enjoyed. Honestly, the kids asked to do it again and we almost considered buying tickets for the other TeamLabs ‘Borderless’ experience that is in Tokyo.

REVIEW: Jetstar’s Brisbane to Tokyo Direct Flight. 

The first flight of our journey was Brisbane to Tokyo direct and I’m thrilled to report that everything went smoothly.

There were a few reasons we chose Japan as the first destination of our year long trip. Firstly, neither Braino or myself have been to Japan and we its one place that we’ve both wanted explore. We’ve also heard how family friendly it can be.

Secondly, we wanted to start with a direct flight to a destination we’d like to spend sometime in and Jetstar’s direct flights from Brisbane to Narita Airport were very affordable considering it how far from Australia we were traveling.

When we said we were flying with Jetstar many people jokingly cast doubts about whether the flight would actually leave on time, if even at all. But I’m pleased to report that it was only delayed by 30mins. 30 mins, I can handle, ha!

We were also pretty happy that the flight time was during the day. It was scheduled to depart at 9:30am Brisbane time and set to arrive in Japan at 5:40pm. Sure, we had to awake up before sunrise to get to the airport by 6:30am. But the kids got a real kick out of waking up ‘at night time’. 

How did we get to the airport? Thankfully Braino’s parents were able to drive the girls in their car with their car seats, while Braino and I went in an Uber with all the luggage. 

Speaking of luggage, because be booked with the cheapest tickets we only pre-paid for 2 x 20kg checked in bags. Braino and I had large cabin bags that we right on 7kg and then girls each had their individual backpacks that were around 4kg each.  It was a bit of a challenge fitting everything into the two large suitcases, but I really did my research on packing cubes and found some great one that compress down with an extra zipper. I also have a coloured coded system for each of use and it’s made packing very organised.

This Jetstar flight has the least amount of baggage allowance, many our future flights are much more generous but honestly, if it wasn’t for all the kids toys, pens and notebooks, I think I could have been even more ruthlessly minimalistic. We will need the extra space once we get into the colder climates. 

Because we were also going super budget; we did not get the tickets that include inflight entertainment or meals. The entertainment was no problems as we were stocked up on pens, notebooks, colouring books, sticker books and we had downloaded a number of shows and movies from Netflix onto the iPad and our phones. 

The kids were really good about snacks. We ate a big breakfast at the airport and only purchased minimal snacks onboard which were obviously overpriced. We probably should have BYO’d our own snacks but it would have been one more thing to squeeze into the bags. 

Although the girls have all been on domestic flights in Australia, it was when they were all either babies or toddlers so this was technically the first flight they have been on that they can remember, and they all handled it so well. Even on take off and landing. 

Overall we were stoked at how drama free the flight was and how well the girls handled the long travel day. When it come to airlines, I’ve always just happy to be on a plane, going somewhere exciting, no matter how budget the airline is.

Once we got to Narita Airport, we then had to catch a bus into Tokyo, which was about 2 hours. I had pre-purchased the tickets and while it was very fairly straight forward to find the bus at Terminal 3, the same Terminal we arrived at, this was were exhaustion really started to kick in. The kids had been great on the flight but the bus trip was a bit of a test of our patience. We had considering booking a night at a hotel near Narita Airport, so we could go straight there once the flight arrived but it would have cut into our sightseeing time the next day, so overall I’m glad we did push through and head straight in to our accommodation in Akasaka, Tokyo.


Where To Start: How to Begin Planning Your Family's Epic Gap Year

Embarking on our family gap year is quite literally a dream come true. But it has come with a lot of planning and research. I happen to love these two things and I’ve been thrilled by how much Michael has got involved in the planning process, it’s been a really fun, collaborative process.

The thought of deciding where to go, what to see and how to connect the dots would no doubt seems like a daunting task so in this post I’ll break down some of our decision making process and a few things to consider, if you were to plan your own extended family adventure.

Begin your global journey by envisioning the countries, regions, or landscapes that resonate with your travel dreams. Whether it's the allure of sun-soaked beaches, high altitude alpine adventures or the exploration of diverse cultures and languages, create a comprehensive bucket list that reflects your passions and interests.

We also factored in specific places and experiences that our daughters have a strong interest in, for example one has a fascination with Big Ben in London and bullet trains in Japan, while another daughter loves animals and has along list of animals she would like to see. 

Once your dream destinations and experiences are on paper, the next step is to dive into practical considerations. Investigate the duration of tourist visas for each country on your list. Understand the exchange rates to gauge the purchasing power of your Australian Dollar or your base currency. Factor in the climate; figure out when the weather is most favourable and if any particular season aligns with your preferences or activities.

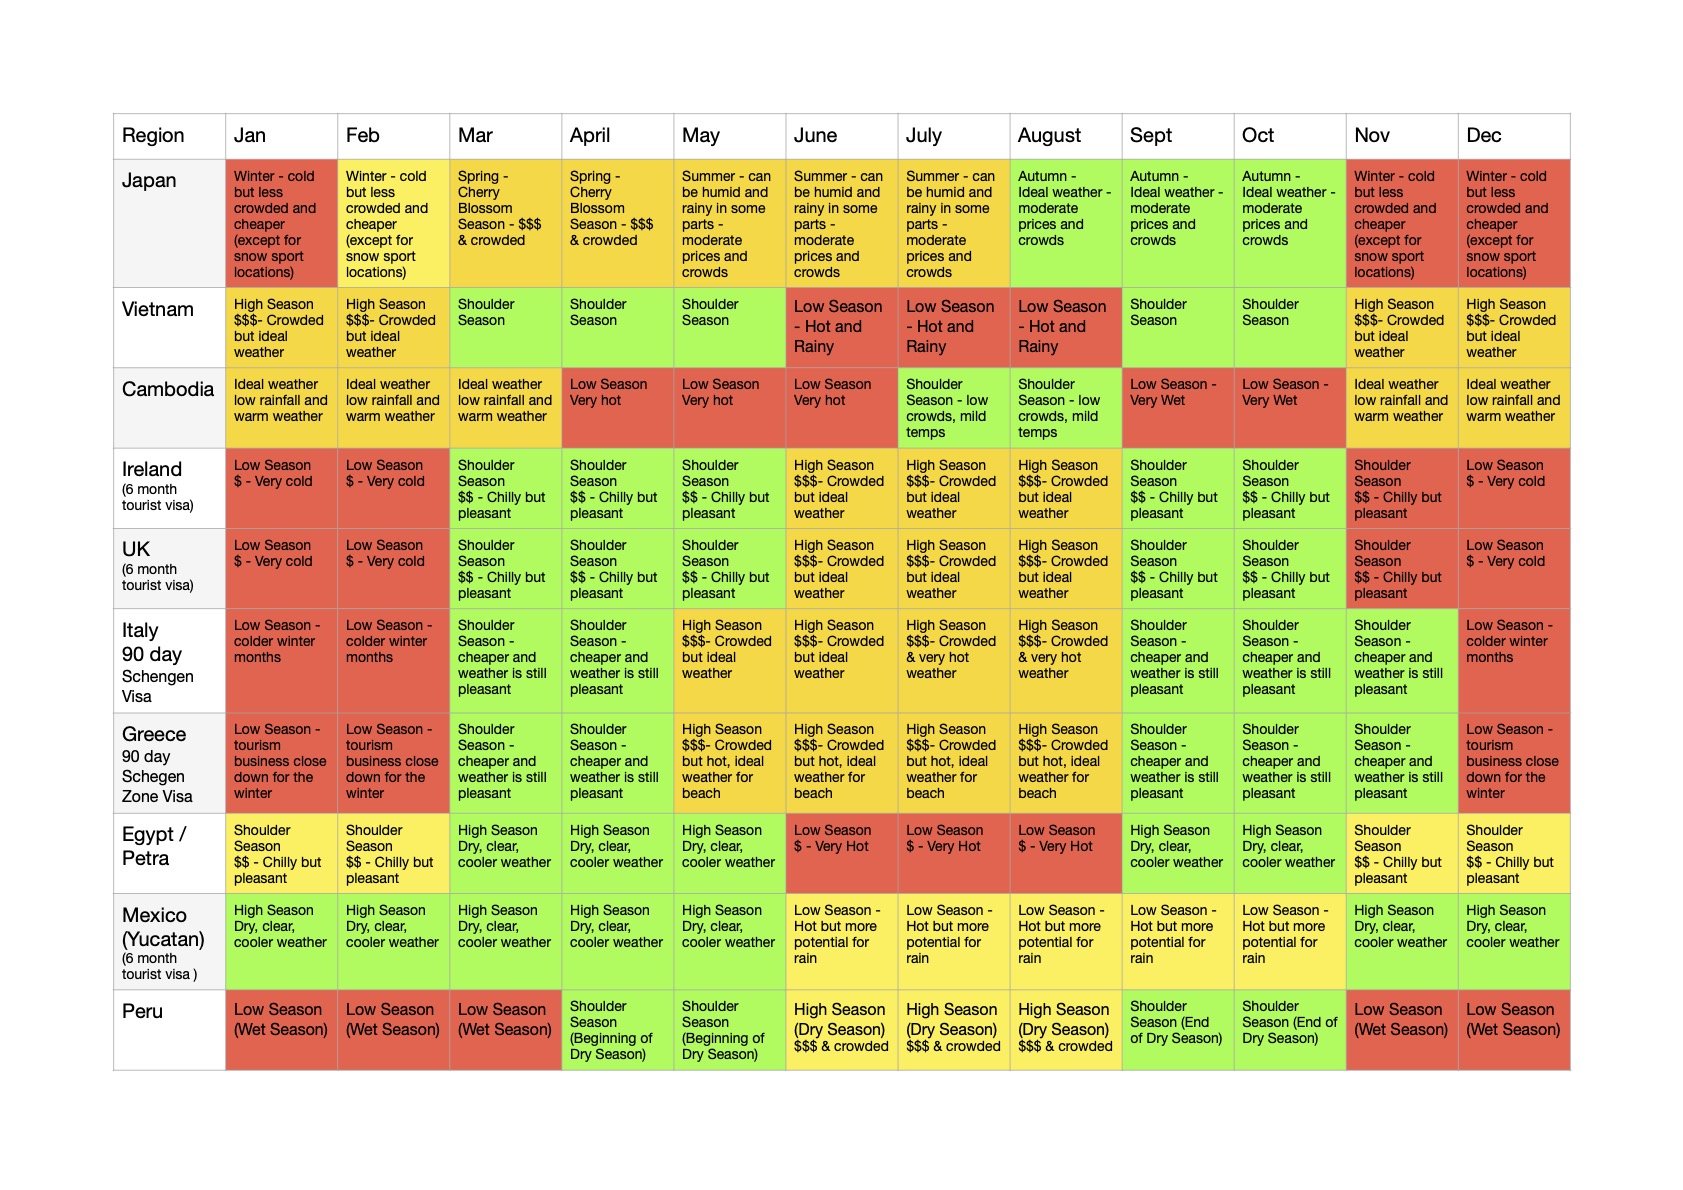
Furthermore, it’s important to consider the concept of peak season, shoulder season and off-seasons. While peak times may offer ideal weather, they often come with inflated prices and bustling crowds. In contrast, off-seasons may be more budget-friendly but could limit certain activities and tours.

Our strategy involves a shoulder season visit to Greece in October, striking a balance between cost savings and the continued operation of transport around the islands . Conversely, for Ireland, we've opted for the peak summer months, accepting the higher costs for the warmest weather.

With these key considerations in mind, dive into researching the costs associated with each destination. This step will help in crafting a realistic budget, aligning with your travel duration in each location. Also, this knowledge becomes the foundation for mapping out an efficient route, both in terms of international flights and inner-country travel. 

I will go into some aspects in more details in further posts, like planning flights, booking accommodation and creating country specific itineraries. However, below are a few handy websites I’ve used along to way to piece together the overall itinerary for our gap year. 

Flight Connections

This websites allows you to see what direct flights fly in and out of any airport in the world. The free version has been fine for what I’ve needed so far. 

https://www.flightconnections.com/

Numbeo 

Numbeo is a good starting point to compare the costs of two countries, for example Australian vs Italy. This can give you an idea of how much to budget for each destination. 

https://www.numbeo.com/

Best Time to Visit

This website is a very handy way to search the best time to visit a specific country or region or you can search the time of year and your desired holiday style. For example - a beach holiday in August 

https://www.thebesttimetovisit.com/

Lonely Planet

I’ve been a huge fan of Lonely Planet since I first came across my Dad’s Lonely Planet guide to Nepal. Their website offers very easy to digest information on every country you could possibly image and I often used this when researching the travel seasons for each country we were interested in. 

https://www.lonelyplanet.com/

Passport Index

This website allows you to select your passport and then see the visa requirements of other countries around the world.

https://www.passportindex.org/

Below is a rough table I made to help visualise the best itinerary for the year. You can see I’ve made notes for each country and each month in that country, then I colour coded it; green was the optimal time to go, generally the shoulder seasons; yellow was the ok time to ok, generally the high seasons and red indicated the time period to avoid, generally when the weather was not ideal. I’m a very visual person and this really helped in mapping out our route, it was easy to create in word / google docs.

Mapping Our Journey: A Look Into Our Adventures Ahead.

So where are we going exactly? What’s the itinerary, you might ask?

Well, we have been chipping away at our master itinerary for the last couples of months. It’s fairly structured but there are still a lot of gaps to fill in at this stage. Here’s the basic run down:

May / June 2024 - Japan (3 weeks), Singapore (4 days) London (6 days)

June / July / August 2024 - Ireland

August / September 2024 - Spain / Italy / maybe Morocco

October 2024 - Greece / Slovenia / Austria / Germany / France

November 2024 - Scotland / England

December 2024 - Denmark / Norway, maybe Sweden

This is what we’ve been focusing on over the last couple of months; booking flights and accommodation. We have certain sections of this itinerary booked in but other parts are still just a rough idea at this stage.

If everything goes to plan; our budget holds up and we’re all still enjoying our nomadic lifestyle, we then plan to spend the first half of 2025 in Central America, primarily around the Yucatan peninsula of Mexico. And maybe even a bit of South East Asia before coming home to Australia.

Our goal is to be away for a full whole year, from May 2024 - May 2025 but we will see how things unfold beyond our initial European & United Kingdom part of the journey.

Adventure Awaits: An Introduction to Our Family Gap Year

It’s finally ticked over in to 2024 and what has seemed like a distant dream is fast becoming a reality.

We have less than 6 months before we depart on what will no doubt be a trip of a lifetime.

Something that I’ve been dreaming about for many many years, and something that we have been actively planning over the last 6 months. Now that we’re on the other side of Christmas and into the new year the countdown for trip is officially on and it’s beginning to feel so real.

The trip in question is our year-long, around-the-world, family gap year. Sounds huge hey?! I almost can’t believe it myself. Who does this kind of thing!? But now as a I write this blog post I can feel my emotions changing. It’s strange because I’ve almost not let myself get excited about it. But I can feel something inside shifting, a sense of genuine excitement that has been buried deep.

Over the holiday period we finally told all of our family and friends and the responses have ranged from pure excitement for us, to genuine bewilderment and maybe a few hints of scepticism and jealously, which is only natural I guess. It’s not everyday that you hear of a family packing up their lives to go traveling for a year, let alone know people who do it.

This is what has finally prompted me to finally start blogging / journalling / documenting the whole process. I’ve been putting it off for a while now but it’s something I’ve always wanted to do; document and sharing my travels.

I’m sure this blog will change and evolve over the year to come but this is just me making a start.